How to Find a Short Circuit With a Multimeter
Written by Staff Writer
A short circuit occurs when an accidental connection is created when a wire carrying current comes in contact with a neutral wire or the ground in a circuit. If you notice fuses being repeatedly blown or that a circuit breaker trips frequently, it could be a sign of a short circuit. You may also hear loud popping noises when the circuit is activated.
By resolving the short circuit as soon as possible you’ll reduce the likelihood of deteriorating wire and its insulation, and prevent the breaker from causing a fire.
Below are listed steps on how to find a short circuit with a multimeter.
Step 1. Check your equipment
The first step in finding a short circuit is to look for physical signs. This may include visible burns or melted metal on wires, burning smells, or flickering lights. Once you’ve identified a potential short, use your multimeter to confirm the voltage by placing it on its resistance or continuity setting.
If you notice a lower-than-expected resistance, then that’s a clear indication that the current being checked is being diverted away from the area, and there’s a short circuit.
Step 2. Test and Repair
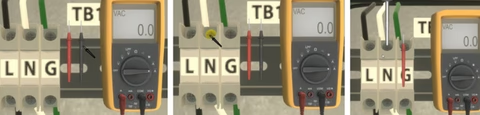
After you’ve confirmed the source of the short circuit, make sure that you shut off the power to the electrical circuit by turning off the circuit breaker. You should then switch the multimeter from its resistance setting to AC volts, and insert the metal probes into the problem receptacle or switch.
Your multimeter should show zero volts. That indicates there’s no power running through the electrical circuit. If, for some reason, there is voltage present, you’ll have to find the right circuit breaker and repeat the procedure to verify that there isn’t any current in the electrical circuit.
Step 3. Check terminal boxes
Now that there’s no power in the electrical circuit, you can switch the multimeter to ohms and check the wires. If your multimeter shows infinite ohms or OL, then that means the breaker could have deteriorated and tripped from a lower current flow. In this case, you need to access the main panel and replace it.
If the multimeter shows continuity, there is a short circuit. It could be caused by a faulty breaker, broken wire, or a faulty receptacle or switch. To resolve the short circuit, replace the defective receptacle or switch. If you still get a continuity reading on your multimeter, inspect all the wires to ensure none of them show bare copper that could touch somewhere and short out. If everything is okay, screw the cables back to their original terminal, and then reinstall them in the box with the wall plate.
TPC Training Solutions
Fixing short circuits can be dangerous if you don’t follow the right procedures. TPC’s training system covers the best practices for troubleshooting a variety of electrical faults you may encounter in your manufacturing environment. You’ll learn how to find a short circuit with a multimeter in a completely safe, 3D environment. Book your demo today to get started!
For more help with troubleshooting, the TPC training platform has everything you need to ensure your maintenance team has the training they need. With our simulations, you can build your own curriculum and give professionals a safe, immersive environment to widen their skillset and reinforce their fundamentals. Schedule a demo for our 3D cloud-based electrical troubleshooting simulations.